In part one I showed how to make quadcopter. But in part 2 I will explain a few things, because I spent a lot of time to search information on the internet. I am beginner, but I learn fast. I wanna help you with what I learned.
1. KK board is very good for beginners. You can check all settings on a lcd screen.
2.I started with firmware 1.2. Fail! First upgrade to firmware 1.5. Now rookies can fly 🙂
With everything connected on board it is time to:
First go to the menu and select RECEIVER TEST. Tune all number to zero with buttons on the transmitter. Then press left and on a screen should be left, right and you should see right, throttle and you should see throttle full and so one. Maybe you would have to change bottom switches on a transmitter to get proper directions.
Next calibrate ESC. Disconnect battery. throttle to full and reconnect battery and hold buttons 1 and 4. You do that without propellers!!!
Next sensor calibration. Put quadcopter on a groud and go to Sensor Calibration. Follow the procedure on a screen.
Next go to Load Motor Layout. I selected X configuration.
Next enter to Show Motor Layout and check configuration.
As you probably see in the motor layout 2 motors must turn in oposite direction. You do that by switching 2 wires on the motor. I put red on black and black on red. Now motors will spin in oposite direction 😉
Now attach propellers to copter. Be carefull with directon of spinning. If you put them on a wrong motor, QC will roll over all want fly.
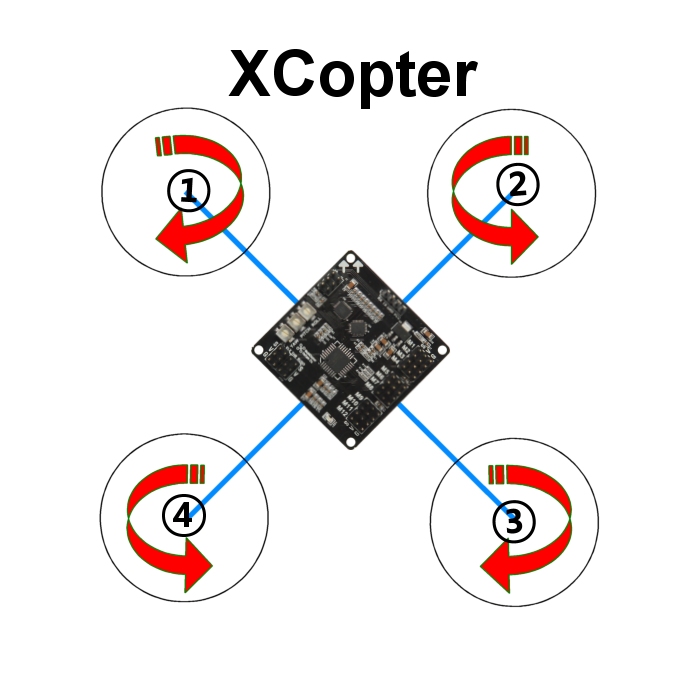
Motors 2 and 4 are both spinning left. So it is very big possibility that screws will loosen and propellers will fall off. You must screw them tight and add washer between propeller and nut. To tight nuts I used slim nail.
Next go to menu Mode Settings. Here you can set how will you start self leveling of QC. You can do it with right stick or with AUX chanel on board if you have more than 4 chanel transmitter. I used 5 chanel ( switch) on a trasmiter. After turning on board self leveling is OFF. You can see that on a home screen of a board. Beginners should use self leveling, because you can learn how to control QC.
Check small things and you are ready to fly. Try to fly outside. Not in a room, I tried that and almost destroyed my lcd tv.
First you have to ARM QC. That means get him out of safe mode. Safe mode is for safety reasons. To arm QC press throttle down and right. You would see red light and hear beep on a kk board. To dis arm pres throttle down and left. Always disarm QC before changing anything on QC. If not you can make damage to QC or get injures!!!
To turn self leveling hold right stick to right while arming QC. After it is ON, it will stay on until you disconnect battery. Then you have to turn it on again.You can turn it off with holding right stick to left while arming QC. But at beginning save money and turn it on 🙂
Or if you use aux connector with switch on a transmitter.
With self leveling on and QC armed you can try to fly. Push throttle gently up until QC is hovering. Lift it to 1 meter and check how it is flies.
You would have to do some fine tuning, but if it is stable at 1 meter, you did fantastic job.
I hope I didn’t miss something. Maybe later I will add more pics.
I give my quadcopter a name. I call it SAF. After great Manchester united manager Sir Alex Ferguson.